The screen looks close, but it doesn’t look like the team’s code
You show an AI a Figma mockup and ask it to build the screen. The spacing and colors are roughly right, but it creates a pile of unfamiliar components. Then a developer has to check values again in Figma, find the right components in the existing codebase, and fix the generated code.
This isn’t solved by simply writing a longer prompt. The AI needs a way to see which frame it should implement and which components, styles, and variables are used inside it. Figma Connect in WebStorm 2026.2.1 creates that path by attaching a reference to the selected Figma node to AI Chat.
Still, installing it alone does not make it automatically choose your team’s production components. You need to distinguish the roles of Figma Connect, MCP, and Code Connect to get closer to the result you expect.
68% and 32% are not answers from the same group of developers
First, let’s correct some widely quoted figures. In Figma’s 2025 survey, it is true that 68% of developers said they generate code with prompts. But the 32% who said they can rely on AI output refers to all respondents, not developers alone. In the same survey, developer satisfaction with AI tools was 82%.
So you should not subtract or compare the two figures as though they mean “only 32% of the 68% of developers coding with AI trust the results.” The public survey also does not establish that missing design context caused the 32% response.
What is confirmed: Figma explains that generated code can diverge from a team’s real implementation approach when design-system information is insufficient. No independent evaluation comparing accuracy, rework rates, or trust before and after adopting Figma Connect has been published yet.
Figma Connect sends a location, not an image
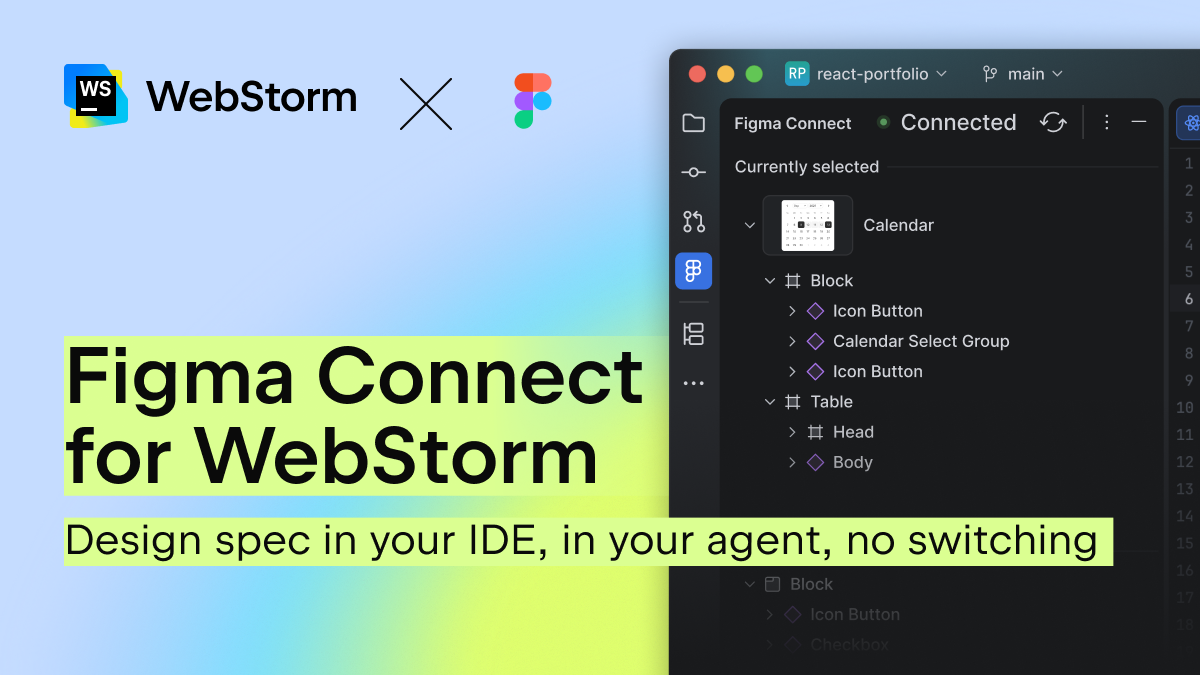
The key point of Figma Connect is that it does not copy a screenshot of the selected layer or the entire file into the chat. It connects the frame, component, or layer selected in Figma Desktop with WebStorm’s selection state, and when you click Add to Context, a reference identifier for that node is added to AI Chat.
Starting from that reference, the agent can read component, style, and variable information supplied by Figma MCP. That is more concrete input than making it describe the screen at length in text or infer its structure from a captured image alone.
| Connection element | Its role | What it does not automatically guarantee |
|---|---|---|
| Figma Connect | Attaches a node selected in Figma as context in WebStorm AI Chat | Automatic mapping to team code components |
| Figma MCP | Provides the agent with the node’s component, style, and variable information | A one-to-one link between production code and design |
| Code Connect | Maps Figma components to real code resources | Correct implementation of every unmapped element |
| Chrome DevTools Connect | Supports browser execution and console, network, and screen inspection | Replacing human final QA and design judgment |
To map designs directly to real components, you need Code Connect
Figma MCP reading design information does not mean that your in-house buttons or shadcn/ui components will be selected automatically. If the agent can access the codebase, it can find and reuse existing components without Code Connect, but there is no guarantee that it will automatically and accurately determine which design component corresponds to which code resource.
Code Connect defines that correspondence directly. Figma distinguishes between cases where mapped design elements and code let an agent reference real code resources, and cases without mappings where it writes new code based on the style context it receives.
To use Code Connect, you need a Full or Dev seat on a Figma Organization or Enterprise plan. Ultimately, the result depends not only on whether Figma Connect is installed, but also on the agent’s codebase access scope, the structure of existing components, and the scope of Code Connect mappings.
You also should not attribute the reported 98 minutes saved per week at companies adopting Dev Mode to Figma Connect. It is an average reported after 200 developers at one company used Dev Mode, while the 20–30% productivity increase is an estimate for a composite organization created by Forrester, commissioned by Figma, based on interviews.
Connecting your first node after opening an existing project
This walkthrough compares a project that already includes a homepage implementation with a Figma mockup. Prepare WebStorm 2026.2.1, a paid Figma seat with Dev Mode or Full Design access, and Figma Desktop that can open the working file. To edit project files from AI Chat, you also need an AI Assistant configured with a JetBrains AI subscription or a compatible provider’s own API key.
- Open the homepage project you want to modify in WebStorm. In the Project tool window, make sure you can see the entry file for the page to compare and the existing components. If it is an empty project, first prepare the framework and page entry file you will use before sending the comparison request below.
- Open the official Figma Connect setup documentation and go to View → Tool Windows → Figma Connect. Select Set Up in the tool window.
- Install AI Assistant and complete chat authentication. If the setup wizard asks you to install it, follow the prompts to install the plugin, and restart WebStorm if Restart IDE appears. If you use JetBrains AI, sign in; if you use your own API key, configure a compatible provider and key in Tools → AI Assistant → Providers & API Keys, then confirm that you can enter prompts in AI Chat. When using BYOK only, official guidance says you may need to disable existing JetBrains AI authentication or set Provider to None.
- Open the design file you want to implement in Figma Desktop. If it is not installed, install it first by following the setup wizard’s instructions.
- Switch to Dev Mode in Figma Desktop. Select Enable desktop MCP server in the Inspect panel. Return to the WebStorm wizard, click It’s Enabled, then choose Per Project or Globally for the scope.
- Select Open JetBrains Connect in the wizard. Run the plugin from Figma’s Plugins panel, click Connect, and then Allow the connection request displayed in WebStorm.
- Confirm that the Figma Connect tool window shows Connected. Under Currently selected or Layers, click Add to Context for the frame or component you want to implement.
- Ask it to compare the attached design with the existing implementation in the project you have open. For example, try: “Compare the attached Figma design with the current homepage implementation in this project and fix visual and layout differences. Prioritize existing project components and design tokens, and explain why if you create a new component.”
There are three criteria for an initial success: the tool window shows Connected, the selected node is attached to AI Chat, and the agent returns an implementation proposal or changes for the project files actually open. If there is no existing page to compare, ask, “Implement the attached Figma design in the specified page entry in the current project,” and name the target file.
Browser inspection continues through a separate connection
The ability to open the generated screen in Chrome and inspect the console, network, and screenshots is provided by a separate Chrome DevTools Connect, not Figma Connect. A related CLI skill is bundled with WebStorm 2026.2.1, but it may ask to install a package the first time you use it.
So it is best to keep the scope narrow on day one. Connect one node, then check whether existing components were reused and identify layout differences. Next, add Code Connect mappings for the components you need and layer on browser inspection; this also makes it easier to tell which connection improved the result.
Three things to check in the first review: confirm that the agent read the right Figma node, reused existing project components, and explained why it created new components or arbitrary style values. Figma Connect’s value lies less in a promise of autocomplete than in reducing the design information the AI has to guess.